7. Optimizing the acoustics in your home studio
Finally the time has come. You know the acoustic problems of your home studio, and you know the technical resources with which to solve them. Based on what you know, we will work to optimize your home studio step by step. We will base our case study on a typical rectangular basement room of a representative size. Generally speaking, there are of course very many acoustic concepts for such rooms, each of which with its very own advantages and drawbacks. Discussing all of them in detail would clearly go beyond the remit of this guide, however, so we will look at the most common concept here, the LEDE (Live End/Dead End) concept.
1 – Choosing your listening position
First of all, you'll need to determine a suitable listening position in the room. Without acoustic measurements, finding the ideal position in a room is pretty much impossible. The sound field in the enclosed space is too complex for you to be able to find the right place intuitively. But there are still some guiding principles that can help you.
The first decision you'll have to take is which direction to orient your speakers to. Do you want the speakers to blast the room lenght-wise or width-wise? There are sound acoustic arguments for either. I would like to suggest orienting the speakers so that the sound is directed along the length of the room. This will result in a far more balanced rendering of the basses in your listening position. The bass spectrum will feature less pronounced slumps and overshooting.
The reason is that the listening position will be further away from the back wall. Reflections from this wall, which can stimulate low-frequency room modes in this direction, are less pronounced thanks to the longer path the sound has to travel. In addition, when you place your speakers in a conventional configuration to emit sound along the width of a room of typical dimensions, the listening position will be more or less in the centre of the room, i.e. in exactly the place where the lowest room resonance and its uneven multiples are at their lowest sound pressure. With sound emission along the length of the room from identically configured speakers, the listening position moves away from the centre, which usually results in an improved mode distribution at the listening position. The distance of the lateral walls to the listening position is reduced in such a set-up, and this does increase the comb filter effect, but we'll show you how to make sure this does not negatively affect the room's sound quality below.
The listening position is usually chosen to be symmetrical to the room's axis. Axial symmetry is important because good stereo imaging with clearly locatable phantom sources is possible only when both speakers are governed by identical side wall reflection characteristics (regarding time delay and levels). With the listening position closer to one of the two walls, the powerful primary reflections arriving at the listening position from this wall are louder and come sooner than those of the other lateral wall. The phantom sources then move closer to this wall or are no longer clearly locatable on stereo basis. Sometimes, however, the listening position is moved out of the dead centre because the dead centre is also automatically the point of maximum cancellation for the lowest room mode and its uneven multiples between the two lateral walls. This can negatively affect the bass sound, just like the room height. In practice it is therefore common to move this point out of the centre - 20 to 30 centimeters are often enough to achieve improved mode distribution at your listening position. This is possible because the strong primary reflections from the lateral walls are usually dampened by the absorbers placed on them as a matter of course. This means that once you have optimized your room, the reflections will no longer negatively affect the sound in any case.
2 – The correct placement and orientation of your speakers in the room
In order to achieve truly faithful stereo sound, setting up your speakers in the so-called "stereo triangle" is imperative. The two speakers are two corners, and the listening position the third, of an equilateral triangle. The speakers are correspondingly turned into the room from the lateral wall at an angle of 30 degrees. The tip of the triangle opposite the speakers should be located just behind the listener's head. The size of this triangle depends on various factors; two-way speakers should be placed at least 1.5 metres apart, the larger three-way systems reguire 2.5 metres distance and more. This ensures that the separate loudspeaker chassis in a speaker are perceived as one sound source.
The distance of the speakers from the facing wall is also a crucial element in achieving great sound. Speakers do not emit deep frequencies straight ahead but rather spherically. Low-frequency sound is thus reflected from this wall with a time delay. A frequency with a wavelength half of which is equal to twice the distance of the Speaker to the facing wall will therefore suffer from cancellation. The same is true - though to a lesser degree - for odd multiples of this frequency. This effect is called speaker boundary interference response (SBIR), and is fundamentally a comb filter effect.
You can counter this effect by choosing as great distance as possible to the facing wall. The further the reflection has to travel, the weaker it will be, and the less pronounced the resulting comb filter effect. This sounds good, but may not be good enough in practice, and should be further supported by placing absorbers behind the speaker. The problem with doing so is that the cancellation effect is moved into ever lower frequencies by increasing the distance of the speakers to the facing wall, and cancellation in these ranges are hard to fight with standard absorbers.
Alternatively, try setting up the speaker as close to the wall as possible. The cancellation effect is stronger in such an arrangement, but occurs in higher frequencies, where absorbers are a more effective tool. You need to keep two things in mind here, though: speakers with a rear bass reflex aperture should not be moved closer than 10cm to any wall so as not to interfere with the bass reflex system. Furthermore, low frequencies are increased by 6dB due to the effect of the sound's reflection being superimposed on itself. Speakers with corrective filters can eliminate this increase. You'll need to test things out in your room to decide which of these techniques is the most suitable.
As far as the height at which you install your Speakers is concerned, I recommend positioning them in such a way that the tweeters are at about ear height. This eliminates the need to angle your speakers, and the sound is then directed straight towards the listening position. This controls table and/or mixing desk reflections so that their effect on the ear is minimized, and it also ensures that the sound of high frequencies does not alter when the listener moves their head forwards or back, as the reproduction is identical horizontally. There is no off-axis colouration.
3 - Creating a reflection-free zone
Once you have determined your listening position and the placement of your speakers, you can start working on creating a reflection-free zone (RFZ) around the listening position. What is the point of this? The goal is to create a zone around the listening position where no intereference arrives for a certain time period after the direct sound. This so-called initial time delay gap (ITDG) should be somewhere between 17ms and 20ms. You can achieve this by dampening the wall and ceiling with broad-band absorbers to attenuate the powerful primary reflections. This reduces comb filter effects, and the reproduction of the phantom sound sources are stable and locatable precisely. You now have to find out where exactly to place the absorbers to eliminate the interfering primary reflections. You can determine the points of origin of these primary reflections graphically. The method is based on the principle that sound reflection adheres to the "angle of incidence = angle of reflection" equation. This is how you should proceed:
- Draw a floor plan of your room to scale
- Add the listening position and the speaker configuration
- Draw several lines in colour (e.g. red) from the right speaker to the right lateral wall
- Add the reflection lines, following the "angle of incidence = angle of reflection" equation
- Draw several lines in colour (e.g. blue) from the left speaker to the right lateral wall
- Add the reflection lines, following the "angle of incidence = angle of reflection" equation
- Repeat this procedure for the left lateral wall as well as the facing and rear walls
- Draw an elevation sketch of your room and repeat the process for the ceiling
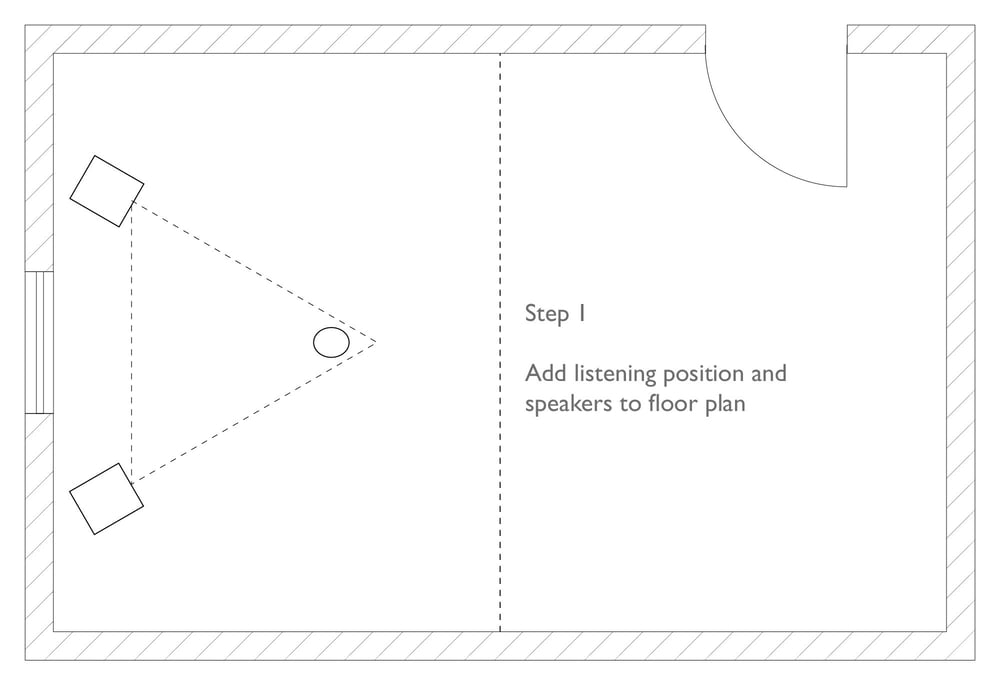
Listening position and speaker configuration in the room
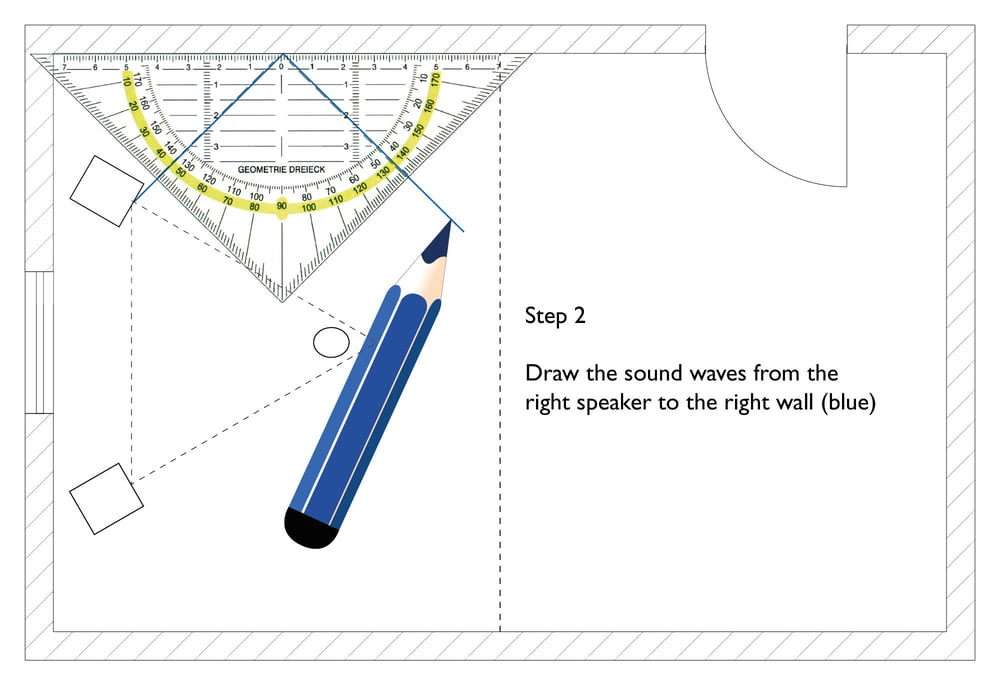
Draw the reflected sound waves according to the "angle of incidence = angle of reflection" equation
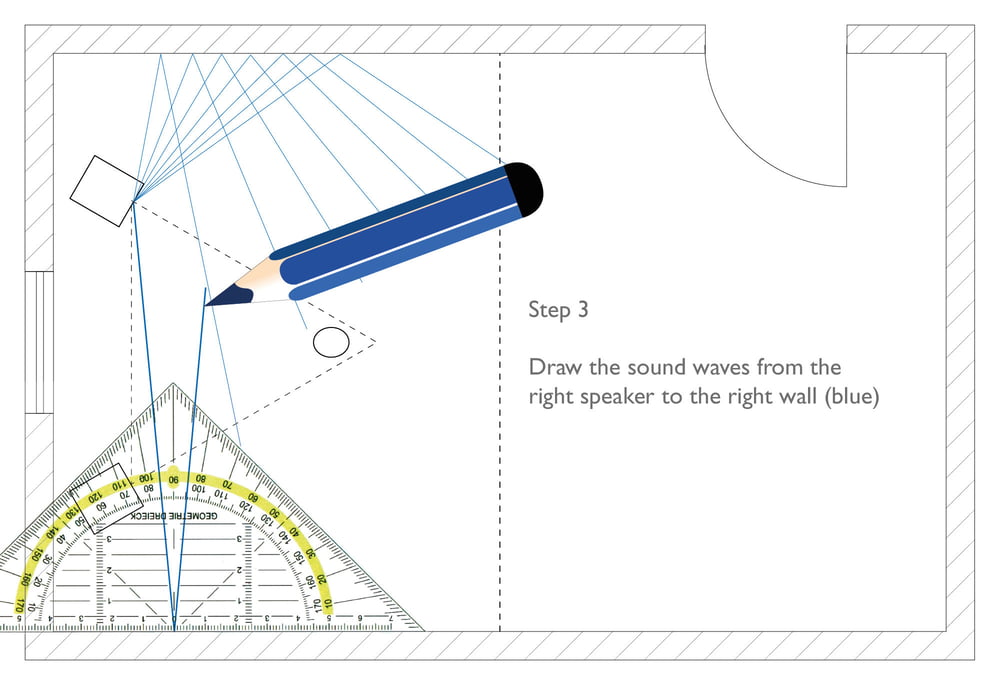
Sound waves from the right speaker to the left lateral wall
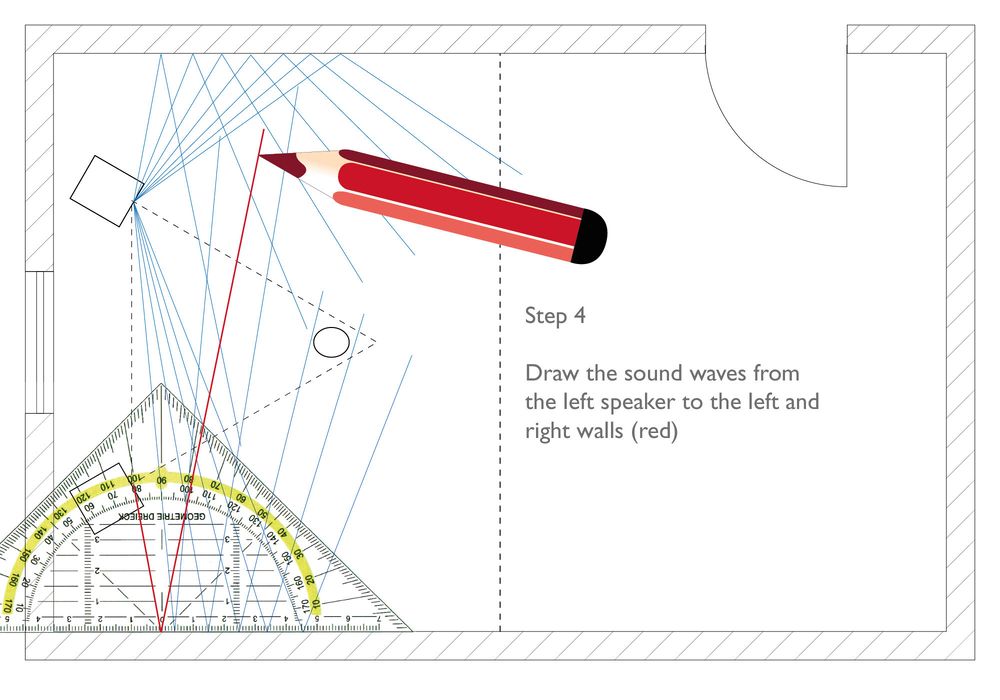
Repeat the prodecure for the left speaker
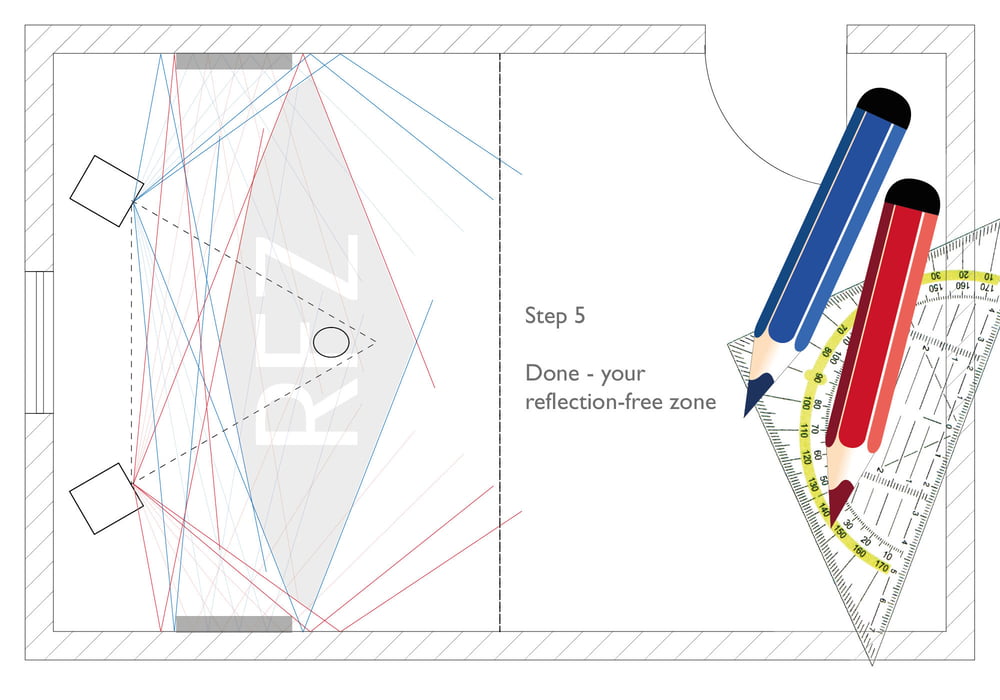
Reflection-free zone around the listening position
You now need to place absorbers on the walls and ceiling wherever the reflected sound waves arrive directly in or immediately next to the listening position. The larger you design the absorbing surfaces, the larger your reflection-free zone will be. Absorbers should always be placed at ear height. Reflections from the floor are not included in this analysis, since your table or mixing desk will in all likelihood cover these reflection points. This reflection cannot be elminated by absorbers. Only the height at which you set up your speakers can influence this reflection positively.
4 – Dampening the room modes
In practice, room modes are always dampened using absorbers which have to be effective in the bass frequencies. Due to their functioning principles, porous and commercially widely available absorbers are of limited effectiveness. Broadband or resonance absorbers are the way to go.
The most effective place to dampen room modes are the corners and edges of your room, as these are the places where low-frequency sound is especially concentrated. Another advantage of placing absorbers in the corners is that it does not matter whether there is resonance between the ceiling and the floor, facing and rear wall, or the lateral walls. In the corners, you can dampen modes irrespective of their spatial orientation. Should dampening the corners alone prove insufficient or impossible due to inaccessibility, you can of course also dampen all limiting surfaces. But this dampening will only be effective for the modes generated between these surfaces.
There is one rule of thumb which holds true in counteracting room modes in smaller spaces. You can basically not overdo bass dampeners. In reverse, it is pretty much impossible to fully linearise the bass frequencies. But you should be able to optimize bass frequency far enough to achieve good to excellent mixing results.
5 – Optimising reverberation time RT60
Optimising the reverberation time (better: decay time) without metrologically analysing your room is only possible based on calculations or rough rules of thumb. To achieve the greatest possible optimisation, you will require an acoustic engineer to properly measure your space. Since the metrological calculations go well beyond what this guide can achieve, we will have to limit ourselves to the rules of thumb, however.
Generally you should always use broadband absorbers to reduce the decay time. Regarding the number of absorbers, they should be spaced evenly across the walls and ceiling. The rear wall may remain free of absorbers, depending on whether or not you chose to implement step 6 of our optimisation plan. Try to avoid large connected areas covered by absorbers; it is better to alternate absorptive and reflective surfaces. Some reflections are necessary to maintain a natural-sounding room; if there are none, it will sound unpleasantly "dead". You can distribute the modules in patterns (e.g. chess board pattern) or irregularly.
The question remains how many absorber modules are necessary to significantly reduce the decay time. A handy rule of thumb is Phillip Newell's 20% rule. It says that you only need to make 20 per cent of a room's surfaces absorptive to effectively reduce reverberation. In practice, you can increase this to up to 80 per cent, depending on your own preferences. To calculate the total surfaces, count doors and windows as wall. This results in this simplified calculation for our rectangular room:

Formula to calculate the areas to be covered with absorbers
Thus, our sample room requires at least 16.8 square metres of broad-band absorber panels to achieve a half-way even decay time. They may be placed on the walls or the ceiling. But what about the floor? Generally, a hard floor covering (wood, laminate) is desirable. Rugs and carpeting are a problem generally, since they are effectively large-scale absorbers for low-frequency sound. If you install additional porous absorbers in the room to treat the upper mids, you'll find that the highest frequencies are already over-dampened. If there are irritating floor reflections in a particular place, you will be best served with a shag-pile runner on the floor in this place.
6 – Increasing diffusion
This step in optimising your room is not strictly necessary, but it may significantly increase the quality of your recordings. The fundamental concept of LEDE rooms is designing the area in front of the listening position absorptively, and the section behind it diffusively reflective. This does not mean covering the front area with absorbers and the rear area with diffusers. In the front area, placing absorbers in places from which interference is reflected towards the listening position is sufficient. The only relevant reflections are usually the initial ones, as secondary and tertiary reflections are usually attenuated to such a degree that they don't retain any potential to irritate.
Direct sound and primary reflections which reach the wall behind the listening position, on the other hand, should be reflected into the room diffusively. This means mounting diffusers on the wall. You can broaden this approach by also covering the portions of the ceiling and side walls behind the listening position which have not been covered with absorbers with diffusers. As a result, the sound field is more evenly distributed throughout the room (i.e. diffused) and prolonged. This further linearises the reverberation and the resulting sound is "larger than life", i.e. it gives the impression of a much larger room.
Done! We have now improved the sample room as much as possible.


